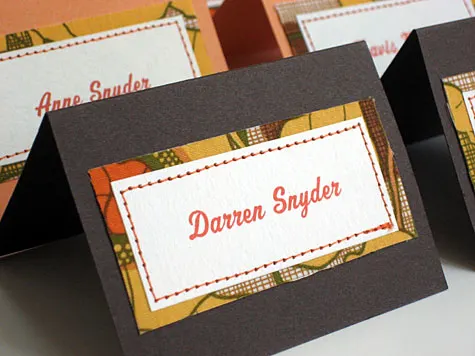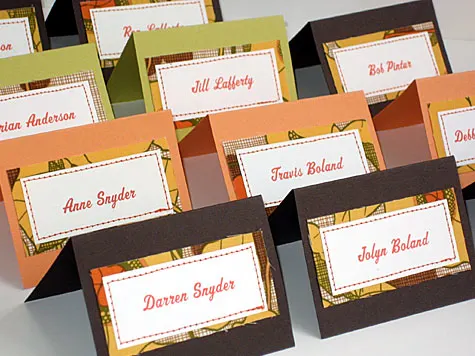

Here’s a simple placecard design that’s equally at home at weddings and showers or the Thanksgiving dinner table. Fabric edges are intentionally left raw to enhance the Holly Hobbie, handmade vibe.
Supplies:
- Kathy’s free place card template (PDF, open in Adobe Illustrator CS3 using Spoleto from Novel Fonts, not Monotype. If you can’t find this version of Spoleto you could substitute Machiarge or Fenway Park)
- 8 1/2 x 11 cream paper
- Brown, green and orange cardstock placecards
- Orange thread
- Fabric
- Paper trimmer
OR Xacto knife set
(this is mine and I love it) and ruler with metal edge
- Gridded self-healing rotary mat
, clear fabric ruler
and rotary fabric cutter
for cutting fabric squares (you will thank me)
- Sewing machine
First edit my template using Adobe Illustrator (or make your own using PowerPoint) with your guest names using Spoleto or one of the recommended fonts above. Print out each guest’s name in orange type. Cut them into rectangles using your paper cutter (which will save you tons of time) or ruler and Xacto knife. Cut squares of poppy fabric slightly larger on each side than the names. Place the cream paper on top of the fabric and center onto the cardstock base. Sew with orange thread.
Now a little tip that adds class to your dinner service. Color code the cardstock base to indicate people’s entrée choice. I chose brown for steak, orange for pork and green for vegetarian. Coding each guest by entrée meant classy and professional service because our servers magically knew what each guest had ordered and didn’t have to interrupt them to ask, which they probably couldn’t remember anyway, and which meant we didn’t run out of anyone’s entrée choice.
We displayed the placecards alphabetically in rows on chocolate brown linen next to our cake where our guests picked them up during the cocktail hour. Your caterer will usually offer to set them out for you but be kind and alphabetize it for them in advance.
Like this theme? Then try our sewn poppy fabric invitations, sewn return address envelopes with custom stamps, table numbers, guest towels, ring bearer pillow, place cards, sewn zigzagged programs, menu, reserved signs, whimsical flower garland “altar” and bridesmaid’s handbags.
Don’t feel like making them yourself? Contact me and I’ll help.
COPYRIGHT NOTE: You’re more than welcome to use this project and pattern for your own personal use. Please post a comment below or email me if you use this project so I can smile when I see that it’s being used. Craft and pass it on!

sprawdzone
Friday 13th of February 2015
Hey, bardzo udane miejsce, napewno chętnie odwiedze Cię tutaj nie raz, bardzo ciekawie piszesz twojego bloga - jest właściwie bardzo ciekawy Pozdrawiam Karolina
my webpage sprawdzone
oczyszczalnie przydomowe
Friday 13th of February 2015
Halo, bardzo dobre miejsce, napewno chętnie odwiedze Cię tu nie raz, bardzo ciekawie piszesz twojego bloga - jest właściwie dużo atrakcyjny Pozdrawiam Faustyna
my homepage oczyszczalnie przydomowe
Mari
Monday 16th of February 2009
I love what you did for your wedding! You are so creative. I do have a question: How did you let your guests know which table they were assigned to? I saw that you had table DIY table number cards, but were those at the tables? I would love to use your ideas, but I would appreciate a bit of clarification. Thanks so much:o)
Kathy Beymer
Tuesday 17th of February 2009
Hi Mari, we put the table numbers on the inside of the placecards (table one, table two, and so on.) I waited until the last minute to figure out the seating chart so we just punted and wrote them with colored gel pens. If you're more with it than I am, you could print out table numbers on the same cream paper as the front and sew them on the placecard back corner, facing out (like a little "1" in a square). That was my original plan.
Another idea I saw lately that I liked was naming tables based on cities you've lived in, favorite restaurants/bars, etc. It's a little harder for guests to find your table but good conversation starters. I'd love to see what you end up doing. Thanks so much for stopping by!!