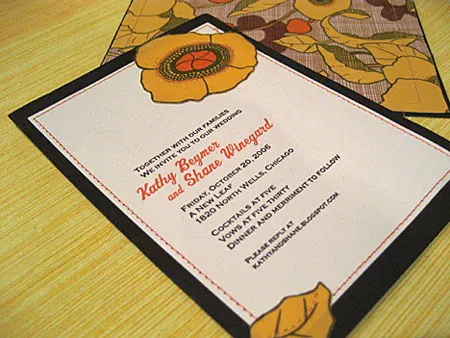
Here are our sewn fabric wedding invitations that were featured in the The Knot’s 2007-2008 Fall/Winter National Magazine and “Amazing Wedding Cakes” on WeTV. After searching fabric stores, websites and even ebay, the poppy fabric I found inspired everything – these sewn wedding invitations in particular.
We received so many compliments from guests who said they were one of the most unique, creative, intimate wedding invitations they had ever received. Of course they’re our family and closest friends. But I felt really proud about the handmade, personal, organic feeling that I created for me and Shane.
Supplies:
- Kathy’s sewn invitation text template in Adobe Illustrator CS3 (429K, uses Copperplate Gothic Bold and Spoleto from Novel Fonts, not Monotype. If you can’t find this version of Spoleto you could substitute Machiarge or Fenway Park)
- A6 size (4 1/2″x 6 1/4″) flat luxe cream cards OR 8 1/2 x 11 luxe cream 210g text paper (also available in bulk) or other heavy paper
- A7 size (5” x 7”) flat chocolate cards
- Flowers and leaves cut out of fabric (edges should be raw)
- (optional) 4.75” x 6.75” fabric squares for invitation backs (edges should be raw)
- Fusible interfacing (craft, medium or heavyweight)
- Orange and yellow thread
- A7 size (5 1/4″x 7 1/4″) chocolate envelopes
- X-Acto knife (this is my kit) and metal edge ruler if you’re printing yourself and cutting 8 1/2 x 11 paper
- Gridded self-healing mat, clear plastic ruler and rotary fabric cutter for cutting fabric squares (you will thank me)
- Good fabric scissors
- Glue stick and/or spray mount
- Sewing machine
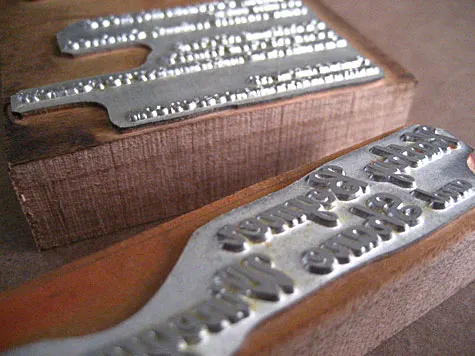
First design the text in Illustrator using my template or your own design. I ordered a plate from Owosso Graphics and my friend John Devylder letterpressed them in his garage. You can also print them on your computer or at Kinko’s. (Note: Buying A6 and A7 flat cards will save you a lot of time because they’re already the right size. However, if you decide to print them on your own computer and your printer can’t handle odd sizes, buy sheets of paper instead of A6, print 2 per page and cut to size.)

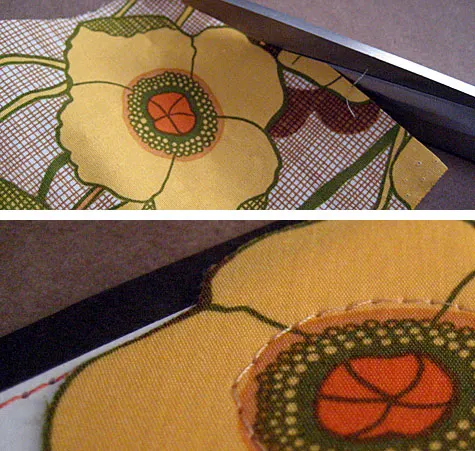
Next, flowers and leaves. Press your fabric flat. Iron on interfacing behind areas of flowers and leaves to stiffen and add weight. Cut out flowers and leaves, making sure to cut slightly *outside* the lines. Remember not every invitation needs to be exactly the same. I cut two different flower and leaf styles and mixed them. For an alternate look you could use decorative paper instead of fabric.
So this is an optional step: I put fabric on the invitation backs. You can see it in the top photo; there are actually two invitations there, one front, one back. I personally liked the detail and repeated the fabric theme in the ring pillow, guest towels, table numbers, wedding cake and escort cards / placecards. Iron craft weight interfacing onto fabric (if using thick fabric you can skip the interfacing). Using your rotary cutter and a metal ruler cut 4.75” x 6.75” squares. Lightly spray mount or glue stick fabric squares on the back of the brown card just to hold it while you sew. Remember all fabric edges are intentionally left raw and unfinished.
Place one A6 cream printed page on top of the A7 flat brown card with fabric back. Sew the cream card onto the brown in 1/8th of an inch from the sides in orange thread; you can either backstitch or tie it off (here’s a time saver: backstitch under where the leaf is going to go).
Next, put one cut flower on the upper right corner and sew around the middle circle in yellow. The flower edges will be raw and loose. Put one cut leaf on the lower left corner flush with the brown edge covering the corner organically, and sew it down near the middle stem. Leaf edges will be raw and loose. You will see the stitching on the back of the invitation; again, this is intentional to add to the texture and handmade feel. Voila!

Like this theme? Then try our sewn return address envelopes with custom stamps, table numbers, guest towels, ring bearer pillow, place cards, sewn zigzagged programs, menu, reserved signs, whimsical flower garland “altar” and bridesmaid’s handbags.
Don’t feel like making them yourself? Contact me and I’ll help.
—
Like it? Share it!
The nicest way to say you like it is to pin it on pinterest, post a comment, follow Merriment Design on Facebook, twitter, pinterest, Google+, instagram or sign up for monthly emails. Enjoy! 🙂
Copyright stuff: You’re more than welcome to use this free project and tutorial for personal use. Contact me for commercial use and etsy sales.

Courtney
Wednesday 14th of September 2011
I did these and they are amazing! Thank you soooo much for the ideas. Here's a link to my photos: https://picasaweb.google.com/110619998100467810167/WeddingInvitations?authkey=Gv1sRgCPDU3fj8-eSGWA
Kathy Beymer
Friday 16th of September 2011
Courtney, these are amazing. Very cute fabric and RSVPs illustration. I love the envelope liners too. Would you mind if I linked to these on twitter? And if you want to share them with others feel free to post on our "I Made It!" flickr group :: http://www.flickr.com/groups/merrimentdesign/. Enjoy your wedding!
Cherry
Friday 13th of May 2011
Hi Kathy!
your invites are indeed one of a kind. .I will surely consider your design to my upcoming wedding! =) I am very happy that I am able to find this!and I am definitely loving it! I would like to ask a question about the cards?Will I be able to purchase it on bookstores (of what kind my dear)? and for the wedding details will it be possible to print it on a cross stitch cloth?
Thankyou and more power! =)
Christie
Saturday 10th of July 2010
Um, I feel you are amazing and I love your stuff. I'd love you, too, except I haven't met you, and probably never will, so that'd be creepy. But I have a serious crush on your design skills.
Kathy Beymer
Tuesday 27th of July 2010
Yay! Thanks, Christie. I'm behind in comments but you just made my day :)
Mandy
Saturday 17th of April 2010
Hello! What beautiful work you do! I have a question about the letterpressing...do you have a special machine that you put the plates in? I would like to use letterpressing for a wide variety of my own needs. (Invitations, table menus, seating cards etc) but this would cost way too much to have someone else do! Any advice you could give me would be wonderful!
Thanks so much!
Максим
Wednesday 24th of March 2010
У меня что-то сегодня с утра Ваш блог был недоступен. У всех все нормально было?